Annotator tutorial
Writing an Annotator
Method developers and researchers can make their results available by packaging them as an OpenCRAVAT annotator and then publishing them to the OpenCRAVAT Store. Annotators typically include a database of annotations for fast high-throughput analysis of large variant files. The preferred storage mechanism for annotator reference data is sqlite databases, but other formats can be used.
This page provides a tutorial for writing an annotator from start to finish. For detailed documentation on each component of an annotator, try Annotator Reference
The completed annotator from this tutorial can be seen at the OpenCRAVAT Modules repository, which also contains the code for most other annotators.
Locating The Modules Directory
To begin writing a new annotator, first locate the path to the modules
directory using the command oc config md.
$ oc config md
/PythonRoot/lib/site-packages/cravat/modules
The modules directory contains all OpenCRAVAT modules, split into
sub-directories by type. Annotator modules will be found in the
sub-directory annotators. This is where a developer will create
their own annotator.
Developers can change the modules directory by passing the new directory
as an argument to oc config md. The command changes the directory
that OpenCRAVAT searches for modules. The command does not move
currently installed modules to the new directory, which must be done
manually if desired.
$ oc config md /my/custom/modules/location
/my/custom/modules/location
$ oc config md
/my/custom/modules/location
Starting from the Template
In this tutorial, an annotator will be created to display SIFT scores for BRCA1. For each variant, the annotator will return the SIFT score, a prediction of Pathogenic or Tolerated, and the number of sequences SIFT analyzed at the position.
To start, use oc to create a new annotator.
$ oc new annotator example
annotator example created at /md/example
This will create a few files at /md/annotators/example
example/
    |───example.md
    |───example.yml
    |───example.py
    └───data/
        └───example.sqlite
Getting data
Most of the work of creating an annotator is usually spent creating a database from the original data source. To save time, we’ve premade example.sqlite from the data at SIFT’s website. Replace the existing example.sqlite with this one.
The database consists of a single table, with one row per single nucleotide variant in BRCA1.
chrom |
pos |
ref |
alt |
score |
nseq |
|---|---|---|---|---|---|
chr17 |
43045706 |
A |
T |
0.001 |
24 |
chr17 |
43045707 |
T |
A |
0.012 |
24 |
chr17 |
43045707 |
T |
C |
0.965 |
24 |
chr17 |
43045707 |
T |
G |
0.012 |
24 |
Next, we will edit example.py to query the database and return the
data we need.
Querying annotations
In example.py there is a python class, CravatAnnotator with
three methods: setup, annotate, and cleanup.
from cravat import BaseAnnotator

class CravatAnnotator(BaseAnnotator):

    def setup():
        # ... setup code will go here ...
        pass

    def annotate(input_data, secondary_data=None):
        # ... annotate code will go here ...
        return out

    def cleanup():
        # ... cleanup code will go here ...
        pass
In this tutorial, we will only edit annotate. Setup and cleanup are
called once each to open and close connections to data sources. But
OpenCRAVAT will automatically connect to
example/data/example.sqlite, and create a database connection
self.dbconn, and a cursor self.cursor. Annotate is called once
for each variant.
More detailed descriptions of the uses of each of these methods can be found in the annotator.py detailed reference.
annotate will take three general steps for each variant 1) Accept
input data from OpenCRAVAT describing the variant 2) Query the database
for annotations 3) Format and return any annotations
Variants are passed to annotate in the input_data dictionary.
{
    #The internal id of this input line. Seldom used.
    'uid' : 1,
    # The chromosome name
    'chrom' : 'chr10',
    # The genomic position of the first affected nucleotide
    'pos' : 87864486,
    # The reference base(s)
    'ref_base' : 'A',
    # The alternate base(s)
    'alt_base' : 'C',
    # coding or non-coding variant
    'coding': 'Yes',
    # HUGO symbol of the gene of the representative transcript (MANE by default)
    'hugo': 'NOC2L',
    # representative mapped transcript
    'transcript': 'ENST00000327044.7',
    # sequence ontology of the variant consequence on the representative transcript
    'so': 'MIS',
    # cDNA change of the variant on the representative transcript
    'cchange': 'c.2104G>A',
    # protein change of the variant on the representative transcript
    'achange': 'p.Asp702Asn',
    # all genes and transcripts mapped to the variant
    'all_mappings': '{"NOC2L": [["Q9Y3T9", "p.Asp702Asn", "MIS", "ENST00000327044.7", "c.2104G>A"]}'
}
``pos`` is in the 1-based GRCh38 coordinate system. If the original input is in hg19, the position converted to hg38 before reaching this point.
Also, coding, hugo, transcript, so, cchange, achange, and all_mappings are available
only when input_format: crx exists in .yml file.
Add code to annotate to extract the variables needed.
chrom = input_data['chrom']
pos = input_data['pos']
ref_base = input_data['ref_base']
alt_base = input_data['alt_base']
Next, create a query and select data from the database.
query = f'select score, nseq from sift where chrom="{chrom}" and pos={pos} and ref="{ref_base}" and alt="{alt_base}";'
self.cursor.execute(query)
result = self.cursor.fetchone()
Finally, format and return the data. You must return data as a
dictionary with a key for each output column. If there is no data for a
variant, return None. In this case, one of our columns was not
stored in the database to save space, we we must compute it.
if result is not None:
    score = result[0]
    num_seq = result[1]
    if score <= 0.05:
        prediction = 'Damaging'
    else:
        prediction = 'Tolerated'
    return {
        'score': score,
        'seq_count': num_seq,
        'prediction': prediction,
    }
else:
    return None
At this point, annotate should look like this.
def annotate(self, input_data, secondary_data=None):
    chrom = input_data['chrom']
    pos = input_data['pos']
    ref_base = input_data['ref_base']
    alt_base = input_data['alt_base']
    query = f'select score, nseq from sift where chrom="{chrom}" and pos={pos} and ref="{ref_base}" and alt="{alt_base}";'
    self.cursor.execute(query)
    result = self.cursor.fetchone()
    if result is not None:
        score = result[0]
        num_seq = result[1]
        if score <= 0.05:
            prediction = 'Damaging'
        else:
            prediction = 'Tolerated'
        return {
            'score': score,
            'seq_count': num_seq,
            'prediction': prediction,
        }
    else:
        return None
Before we run the annotator, we need to tell OpenCRAVAT how to interpret
and display the results. We do this in the config file example.yml.
Displaying results
The annotator config file tells OpenCRAVAT what columns to expect from
the annotate method, and how to display them in the results. It also
contains display hints and metadata for the annotator itself, and
attribution to the original data source.
The annotator uses yaml format, which is more readable representation of JSON, and python dictionaries.
To start, make a few edits to the parts that describe the annotator itself. Be sure to edit the relevant lines in the yml, don’t add new lines.
title: Example (SIFT BRCA1)
version: 1.0.0
description: Example annotator. BRCA1 scores from SIFT, a variant effect predictor.
Next, replace the output_columns section with this.
output_columns:
- name: prediction
  title: Prediction
  type: string
- name: score
  title: Score
  type: float
- name: seq_count
  title: Seqs at Position
  type: int
Three keys are needed to describe each column - name is the internal
identifier of the column, it must exactly match one of the keys in the
dictionary returned from annotate. Column names should only include
lowercase letters, numbers, and underscores. Names cannot have two
underscores in a row, and cannot start with a number. - title is the
display name of the column, it will be shown in place of the name in
reports whenever possible. - type is the type of the column data.
Choose from string, float, or int.
Many more keys can be added to output columns to change their behavior in reports. Three are worth including in this annotator. Edit the yml again so that it shows:
output_columns:
- name: prediction
  title: Prediction
  type: string
  desc: Tolerated if Score > 0.05. Damaging if Score <= 0.05
  width: 70
- name: score
  title: Score
  type: float
  desc: Ranges from 0 to 1
- name: seq_count
  title: Seqs at Position
  type: int
  desc: Number of sequences scored by SIFT at this position
  width: 60
  hidden: true
The desc key is a longer description of a column. It shows up when
the mouse hovers over a column in the GUI. The width key controls
the width of the column in the GUI. It is measured in CSS pixels.
Finally, hidden: true will hide a column by default in the GUI. To
conserve space, most annotators should only show 3 or fewer default
columns.
A full list of accepted and required config properties can be found at
the `annotator.yml <./Annotator-Reference#annotatoryml>`__ reference
documentation.
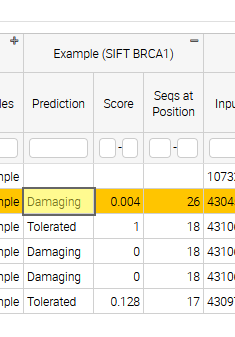
Running the annotator
At this point, the annotator should have everything it needs to run.
This vcf
file
contains a few pathogenic and tolerated BRCA1 variants, and one variant
not on BRCA1. Run it with oc run input.vcf -a example and check out
the output with oc gui input.vcf.sqlite. It should look something
like
The sqlite database
After all annotatos are finished, OpenCRAVAT aggregates all annotations into a sqlite database. It can be helpful to know how to find your annotators output in the database.
Variant level annotations are written to a table called variant. The
column names are made by combining the annotator name and the column
name with a double undersore. So, for our annotator, the database
columns are called example__score, example__prediction, and
example__seq_count.
The config for each output column is written to the variant_header
table, and the config data for the annotator is writted to the
variant_annotator table.
DB Browser for SQLite is an excellent cross-platform GUI for reading sqlite files.
Debugging
Finding Errors
When oc runs, two logs files are created: input.vcf.log and
input.vcf.err. Exceptions raised by example.py will show up in
these two places. The traceback is put in .log, and the variant causing
the exception is put in .err. If the same exception occurs again, .log
is not written, but .err contains all variants that caused an exception.
Raw annotator output
Remove any output files from a previous run, and run oc again with the
--temp-files flag. This will keep temporary files around after the
job finishes.
rm input.vcf.*
oc run input.vcf -a example --temp-files
There should be a file called input.vcf.crv.example.var. This is the
raw output of the example annotator. It includes some header lines with
information from the module config, and tab separated data lines.
#name=example
#displayname=Example (SIFT BRCA1)
#version=1.0.0
#column={"index": 0, "name": "uid", "title": "UID", "type": "int",...
#column={"index": 1, "name": "prediction", "title": "Prediction", ...
#column={"index": 2, "name": "score", "title": "Score", "type": ...
#column={"index": 3, "name": "seq_count", "title": "Seqs at ...
#no_aggregate=
#UID    Prediction  Score   Seqs at Position
2   Damaging    0.004   26
3   Tolerated   1.0 18
4   Damaging    0.0 18
5   Damaging    0.0 18
6   Tolerated   0.128   17
Running directly
It’s possible to run an annotator without running all of OpenCRAVAT. Clean the working directory, then run oc but end at the mapper stage.
rm input.vcf.*
oc run input.vcf --endat mapper
At this point, there is a file, input.vcf.crv that contains all of
the variants in your input file. You can pass this file to the annotator
to create input.vcf.crv.example.var directly.
python3 md/annotators/example/example.py input.vcf.crv
When run this way, the .log and .err files will be
input.vcf.crv.log and input.vcf.crv.err.
This method can be used to run annotators with debuggers in most IDEs like VSCode, Spyder, or Jupyter.